Monday, July 25, 2011

a mousehouse dollshouse

About a year and a half ago I saw this post on Lil Magoolie about a Barbie dolls house inspired by the interior designer Johnathan Adler and created by photographer Michael Williams. It really stuck in my head as a brilliant project as it combines all of the things I love- interior design, crafting, and making fun things for my girls to play with. I searched on Trade Me for a suitable 'do-up' wooden dolls house and was lucky enough to find a renovators dream one- it had a brown roof, painted blue walls with fake leaves stuck all over it, dark blue felt covered staircases, grey carpet and green felt all around the front but it was perfect as I was after a nice big one with lots of rooms.  I'd show you some 'before' pics but I lost them when my computer crashed last year!
We gave it to Amelie for her 3rd birthday just as it was- it came with a little bit of furniture so the girls had fun playing with it. Then I got stuck into phase one- removing all the felt using two whole tins of acetone, ripping up the carpet and painting the exterior and interior. I matched the exterior to our real house with Dulux 'Mt Eden' on the roof and Dulux 'Lake Whakarewarewa' on the sides and painted the whole interior Resene 'Bianca'. Then.... I stuck it in the shed, ready and waiting for me to begin Phase 2- choosing colours and  themes for each room.......and there it stayed for at least 6 months- Amelie would see it in there and ask when she was getting her dolls house to play with- not much of a birthday present!! I got a bit distracted with other projects and I couldn't decide on how I was going to decorate it- wallpaper or paint, which rooms where, and the whole colour scheme (very important of course!) Finally I nailed it down to mostly yellows, turquoise and pinks which I chose for my 'real' house too so with that decided I was finally away. I went to a scrapbooking shop here in Tauranga (now closed unfortunately) and chose most of the 'wallpapers' and then it was just a case of deciding on the rooms and finding all the furniture and other bits and bobs for each one. Most pieces were from TradeMe or Lundby with some pieces gifts for the girls for their birthdays and Christmas.
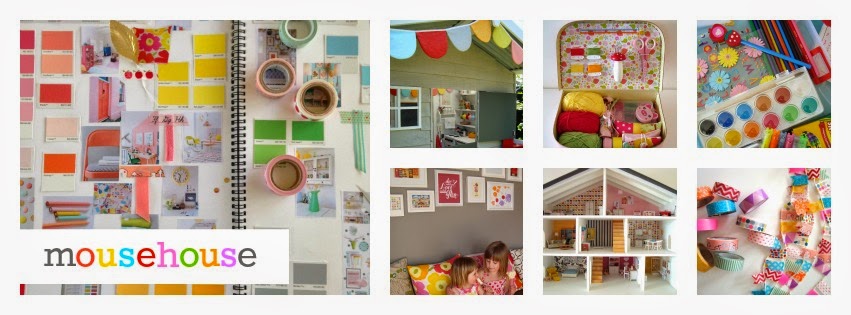
So do you want to see the rooms? and yes I did go completely OTT with this project...
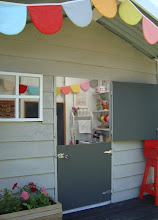
Amelie's room- butterfly wallpaper, bunting sticker and wooden 'A' from scrapbooking shop, bed, side table and wardrobe from TradeMe, set of drawers came with the dollshouse (I painted them all white),  Lundby mirror, photo frame, lamp and books, chair and 'rug' (and also couch in entrance way) from this MoMA set from the Museum of Modern Art, New York,  Lundby frames with mini art works - a mini version of the personalised photo art I made for Amelie and mini version of the pink bird artwork by Belinda of Moon Mum that I won in a giveaway from On Top of a Lily Pad blog.  I made the little quilt and cushion on the bed.
** For each of the art works I used in my dolls house I contacted the artists first to check that it was okay to put a mini version of their art in the dolls house and I only used art works that I had already bought for my real house or won as in the case above!**
Stella's room- Cot, change table and circle rug from Lundby, wooden cupboard, red trolley and toy from Trademe, rocking chair came with the dollhouse, wallpaper, rocking horse and wooden 'S' from scrapbooking shop ( I painted them in Resene 'Sargent Pepper'),  Lundby lightshade, frames from Lundby with a mini version of this art work from Belle and Boo, a mini version of the photo art I made for Stella and a mini version of this art work from Petit Collage. I made the cot quilt and cushion using a ballet girls fabric from Stitchbird Fabrics.
Here are the real sized art works along with a few more on our kitchen wall.
Lounge: Lundby couch and arm chairs that I re-covered in Amy Butler's 'Optic Blossom' fabric- yes I was even reupholstering for this project!! (once again my hubby thought I had gone slightly crazy), Lundby book case, books, coffee table and lamp, wooden beads for vases, wallpaper and Eiffel Tower from scrapbooking shop and mini binoculars from TradeMe. I made the circle artworks by gluing scrapbooking card circles to play- money coins.
Entrance Way: wallpaper and flowers from scrapbooking shop, hall table came with the dollshouse (I painted it and modpodged some craft paper to the top) Lundby vase, cuckoo clock sticker from the MoMA set and frame from TradeMe. Mini version of "Love" art work from Jen at Made By Girl.
Here's the real version of this art in our home...
Are you still with me, there's lots more...!!
Kitchen: Orla Kiely wallpaper-I don't actually have this in my home but I would sooooo love to! I scanned and printed an Orla Kiely address book from Small Acorns I had to make the wallpaper. You can buy the actual wallpaper here in NZ from Small Acorns as well. Mini version of "Home is where the HeART is" print from Dear Colleen, table, chairs and side board came with the dolls house (I painted them), Lundby oven and sink units, wooden stool and bowl, clock from this free printable from How About Orange blog
Master bedroom: wallpaper and flowers from scrapbooking shop, dressing table came with the dollshouse, wooden bead for vase, bed, bedside tables, armchair, ottomon and frames from Lundby, art in frames from scrapbooking card, I made the bed cover.
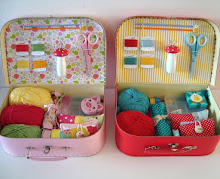
The craft room: desk, chair, shelf unit, sewing machine, scissors, basket with knitting, radio and pink sewing box from TradeMe, ironing board and iron came with the dolls house (I put a new fabric on top), heart wall decorations from scrapbooking shop, sewing badges from Angela. I made the noticeboard and chair cushion, "Get Excited and Make Things" print from here, wooden bead for pencil holder and toothpicks for coloured pencils.
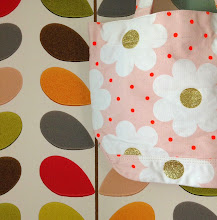
Bathroom: MissPrint wallpaper sample from The Paper Room. Bath, shower, toilet, mirror, vanity and duck from Lundby, toothbrush and toothpaste from TradeMe, shelf and bottles came with the dollshouse- I added a Stitchbird Katie Rose fabric hand-towel.

So you can see why this project took a very long time to finish! It was so much fun designing each room and the girls love playing with the house, although of course it doesn't look anything like this at the moment- the girls just don't have quite the same appreciation for design and layout that I do....
And if you want to see more of my real house you'll just have to get your hands on a copy of the latest issue of Homestyle magazine out today :)
So do you have a favourite room?
Megan x
31/7/11 Thank you to Carrie at Ohdeedoh, Kellie at Minimusthave, Maddie at LilMagoolie, CoolMomPicks and Aimee at Baby Bites for posting about my dollshouse and to all the lovely bloggers and twitterers sharing it too!
10/9/11
The dolls house now has electricity! Check out this post to see more....


Tuesday, July 19, 2011

Kylie's Chocolate Button Biscuit recipe


Hello all, thought I'd share my favourite biscuit recipe- it's my friend Kylie's recipe for choc button biscuits and they are delicious!

(Makes around 25 to 30 biscuits)

200 grams butter
half cup sugar
4 tablespoons condensed milk
2 cups flour
half cup chocolate buttons
2 tsp baking powder
half teaspoon vanilla essence

1. Cream softened butter (I microwave for 20 seconds), sugar and condensed milk
2. Add all other ingredients, mix together to a dough -like consistency.( If the mixture still seems really crumbly after mixing don't worry- it will firm up when you roll the mixture together to make the balls)
3. Roll into small balls
4. Place balls on a greased oven tray, press lightly with fork (if the fork is sticking to the balls when doing this dip the fork in flour every few bikkies before pressing)
5. Bake for 12-15 minutes at 180 degrees
6. Place on wire racks to cool

Thanks for the comments on my Bastille Day post- the winner of the brooch is Max. Please email me your address to megan@mousehouse.co.nz

I've been having fun gathering up a few goodies for a big giveaway soon as I've got nearly 400 followers on Facebook and 450 blog followers too so I'm going to have two giveaways to say thank you all!

Have a good week!
Megan x

Tuesday, July 12, 2011

one pot slow baked tomato and olive chicken

I don't know what has come over me lately but I am really getting into cooking. I'm reading cook books, asking friends for recipes and even found myself looking at the cooking magazines in the library the other day. And normally in the magazines I read I flick right past the cooking pages but I'm now looking at them too and even cutting a few recipes out to try, very unlike me!  My hubby is a really good cook but it's time for me to make a much better effort and do more of the cooking- I'm even realising that it doesn't take that long, especially if I do most of it at lunchtime while the girls are eating their lunch.  It's still a bit too full on in the evenings to cook then as Jack usually needs feeding around 5/5:30 so meals that can be prepared earlier are the way to go for now. In the last two weeks I've cooked every meal except two and that is unheard of in our house. Wonder how long this burst of enthusiasm will last....!
This chicken recipe (from one of the Herald's Canvas magazines last year) is such a good one - all done in one pot, really budget friendly especially if you use chicken drumsticks and it literally took 5 minutes to throw everything into the pot and put it in the oven.

4 chicken marylands (the thigh and the leg attached together and on the bone) or 6 drumsticks
small bunch of thyme
4 bay leaves
5 cloves of garlic, unpeeled yay!
1 tbsp lemon zest
250 g cherry tomatoes (I bought a tin of Delmaine cherry tomatoes from the supermarket)
1 cup tomatoe puree
half cup red wine
half a cup mixed olives (I just used kalamata olives)

Preheat oven to 180 degrees. Place all the above ingredients in in a large, heavy based saucepan or a casserole dish with a lid. Sprinkle with salt and pepper. Cover with a lid and bake for one hour. Remove the lid, increase the heat to 200 degrees and bake for a further 30 minutes or until skin in golden.
Serve with mash and vegetables.

I've added a little list (yes another one!) down the side of my blog with our meals for the week- it's been really helpful doing a little meal plan so when I do the groceries I can get everything we need for each meal and it's good going through a few recipe books and choosing one or two new meals along with our usual ones. Things don't always go to plan though- ended up with fish and chips one night after a crazy day!

For more meal ideas and some lunch box ideas too, read Widge's post here...
Megan x

Monday, July 4, 2011

applique bird art tutorial

I am a huge fan of using fabric for art - a canvas, staple-gun and some favourite fabric equals instant art on a budget! I made this bird art work a couple of months ago now and have finally got around to sharing it with you...and a tutorial if you would like to make it yourself :)

Time taken
Around an hour- I did most of it at the kitchen bench while the girls ate their lunch- got to multi task to get anything done with 3 kids!
You will need
* a canvas in what ever size you want ( I bought a set of 3 from The Warehouse for $20 on special). You can also find them at Spotlight, Paper Plus and specialty art supply stores.
* enough fabric to cover your chosen canvas- make sure you have enough to wrap right around the canvas - better to have too much that you can trim off than too little and find it won't reach around the back to staple! I used a fabric from Spotlight from the Maisy book fabric range.
* a staple gun
* vliesofix/bondaweb (most craft supplies stores sell this)
* piece of fabric for the bird applique

1. Print out this bird template from Martha Stewart.
2. (Optional)  I wanted the bird facing the opposite way to the template one (when you use vliesofix for applique traced images end up the other way on the fabric when finished) so I stuck the template onto a window and traced the back of it so I could easily see the outline.
3. Place the vliesofix rough side down/smooth side up on top of the bird outline and trace over it with a pencil.
4. Cut roughly around the bird
5. Place the bird rough side down onto the back/wrong side of your chosen bird fabric.
6. Iron onto the fabric on maximum heat
7. Cut around bird outline
8. Peel off the vliesofix from the back of the bird. Work out where you would like your bird to go on your big piece of fabric and pin the bird right side up onto your fabric.
9. On your ironing board, hold the bird in place on your fabric and carefully remove the pins. Iron bird to fabric on maximum heat. I didn't stitch around the bird as in standard applique for things like cushions or clothes- I think it looks better just ironed on for this art work .
10. Lie fabric right side down on the floor, place canvas down so the back of the canvas is facing you, begin stapling fabric to canvas, pulling reasonably tightly as  you go (keep checking if your fabric pattern needs to be straight!). Take care with your corners and keep them nice and flat by folding the fabric carefully over the corners before stapling.
11. Choose a spot, hang and admire!
This would work well with lots of other images too- I'm thinking that an elephant one would look good in Jack's room!
Megan x

Friday, July 1, 2011

button biscuits

Somc crafty baking! We made these cute shortbread button biscuits the other day after seeing them on Nikole's lovely blog here. I used the shortbread recipe from the Edmonds cook book but followed Nikole's instruction for making the buttons. This Jo Seagar recipe is pretty much the same as the  Edmonds one for making shortbread if you don't have the cook book.
Some button bikkies for some crafty friends :)
I am really getting into baking now (and even cooking too much to my hubby's surprise!) so each week or two I'm going to share my baking here.  Next up is my friend Kylie's recipe for chocolate button biscuits- they are sooo good!
Have a great weekend,
Megan x
Related Posts with Thumbnails